
Product updates
What's New
Release notes for WorkNex — new features, improvements, and fixes.
Get What's New by email
The same release notes and screenshots as this page, delivered to your inbox.
35 versions — older ones stay collapsed
Work Summary — Nov 9–15, 2026
This week focused heavily on material ordering, vendor credits, direct-mail marketing, QuickBooks integration, production workflows, calendar management, and reporting accuracy.
The biggest updates were improvements to the new Job Materials system, including vendor selection, material templates, returns, and credit memos. Direct Mail now supports both postcards and roof-estimate mailers, while QuickBooks received better invoice matching, automatic invoice options, and product mapping.
Additional improvements include Add Service for after-sales work, color-coded Backlog maps, recurring appointment controls, subcontractor document protection, and more accurate CSR and sales reporting.
1. Job Materials — Vendor Directory Improvements
The new Materials system introduced last week received several improvements to make purchasing easier.
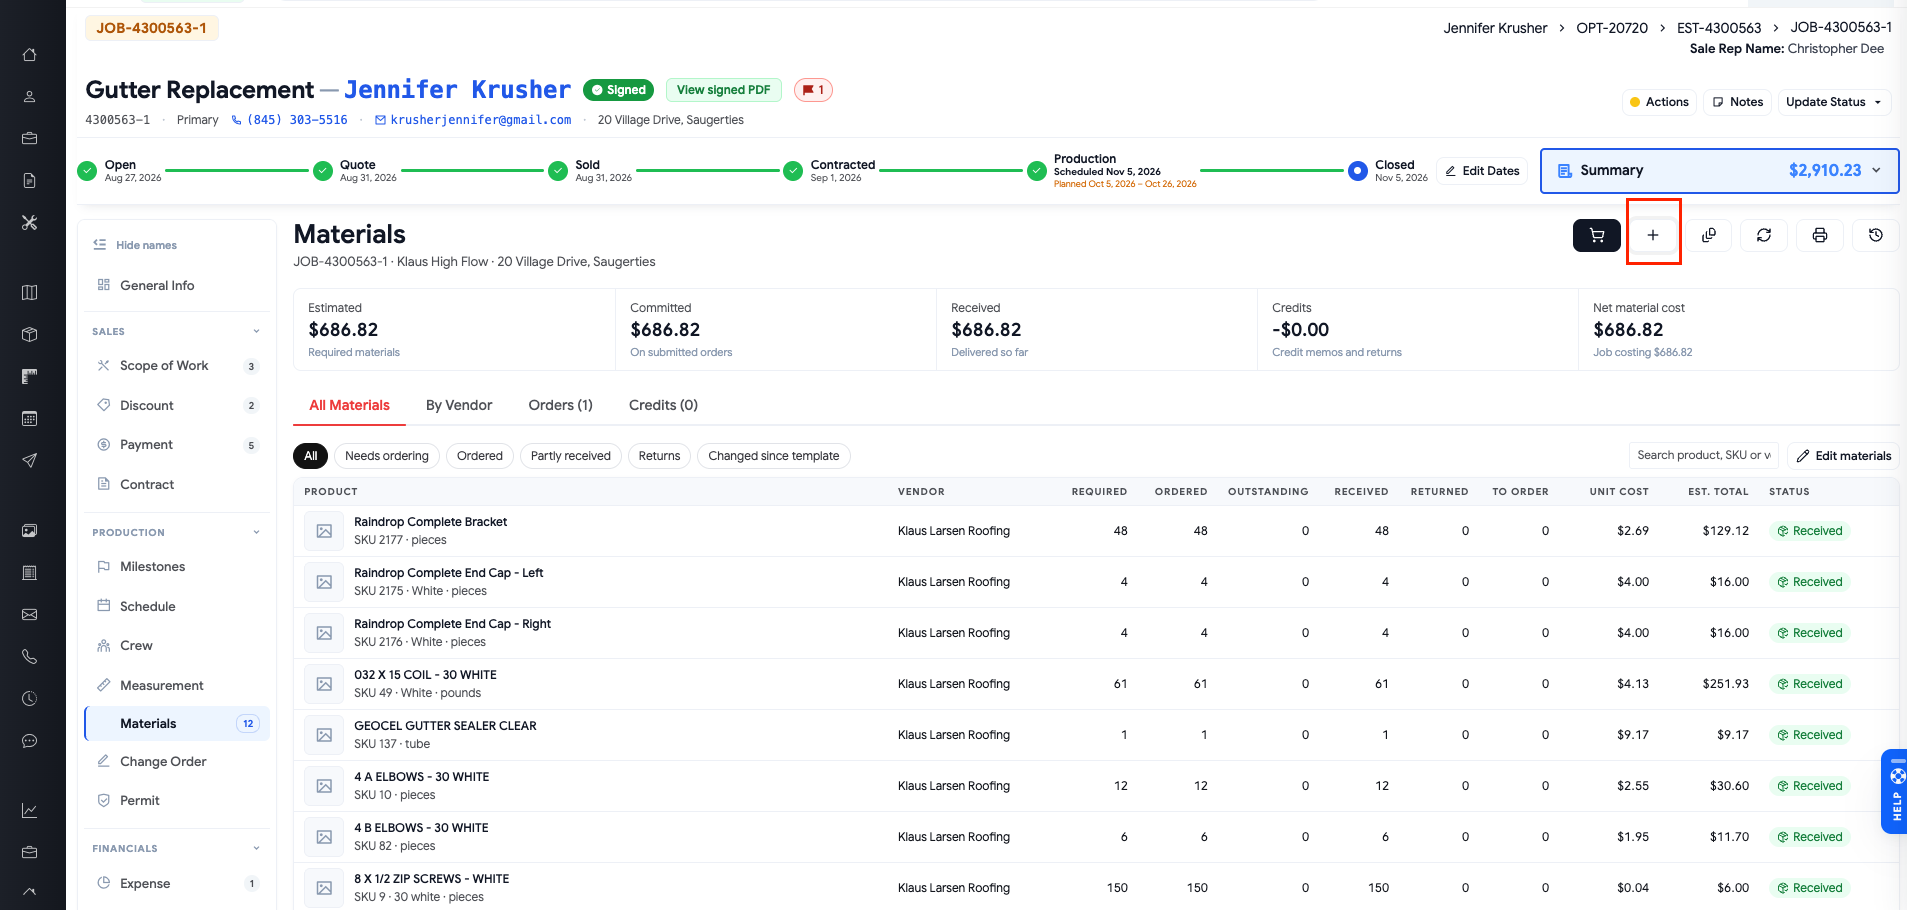
Where: Job → Materials
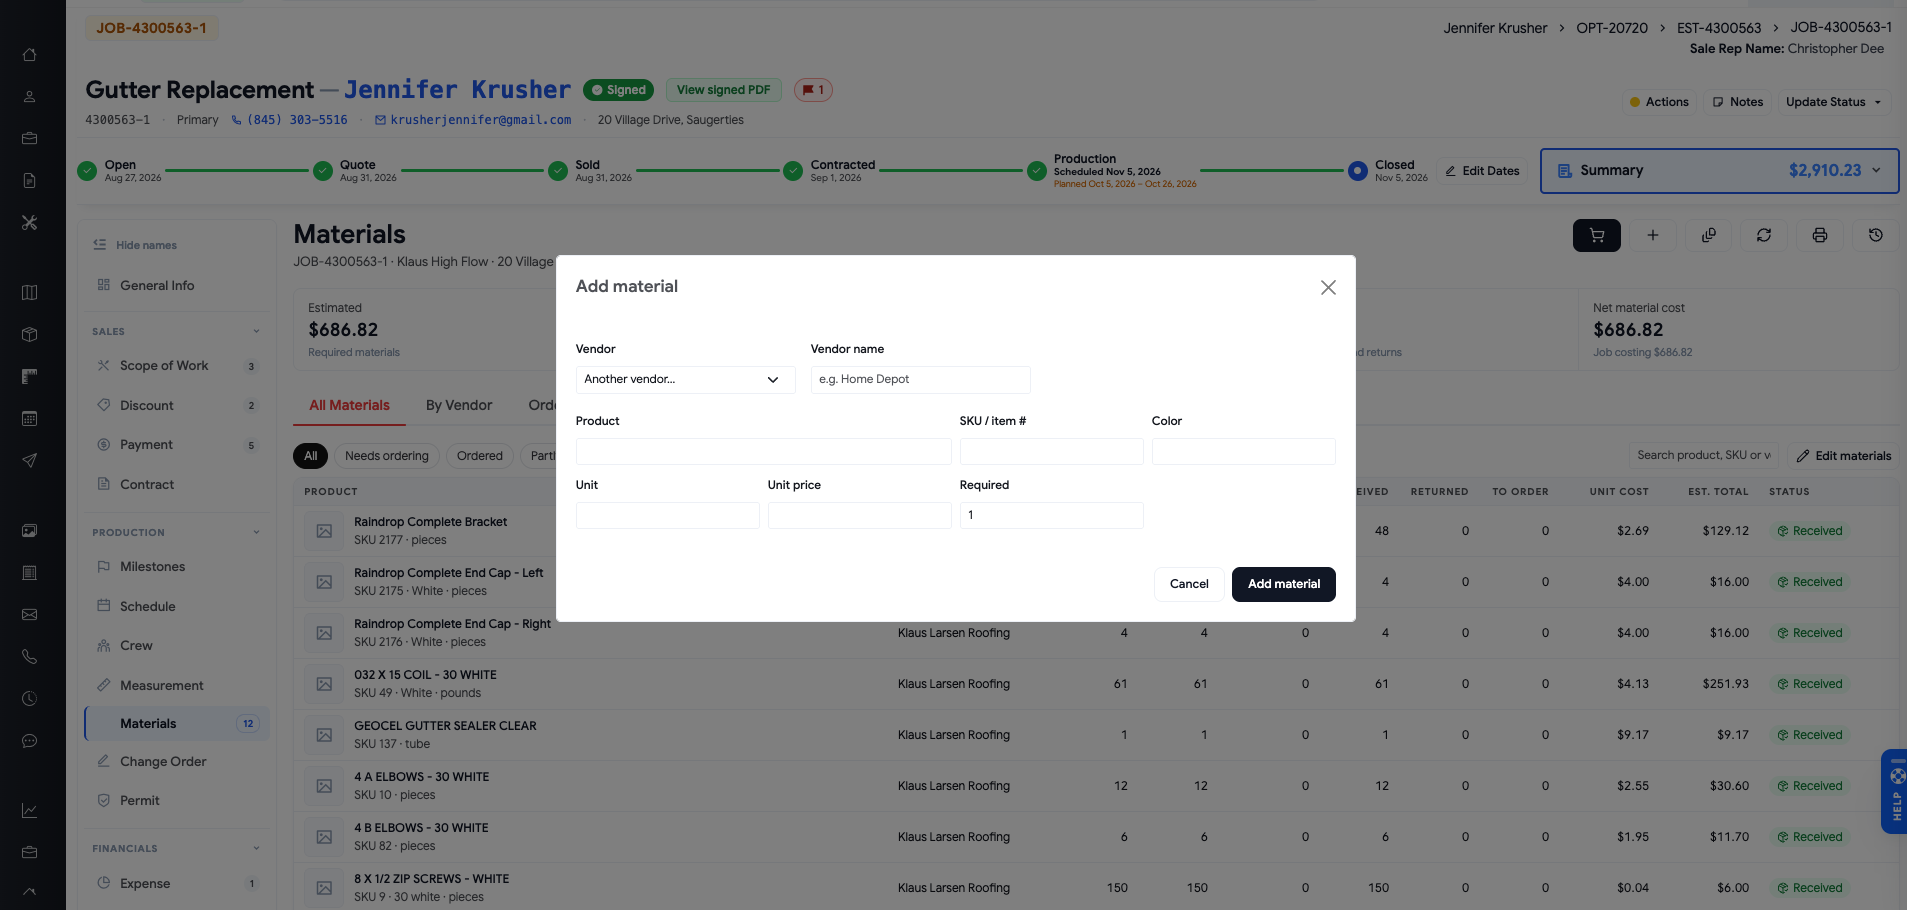
When creating a purchase order or adding materials, Klaus Connect now provides a more organized vendor selection.
Vendors are displayed in the following order:
Vendors already associated with the job
QXO, when connected
ABC Supply, when connected
Other vendors from the company directory
Employees can also enter a vendor name manually when needed.
This makes it easier to work with suppliers that are not part of a direct ordering integration.
How to Use
Open a Job that has moved beyond the Open or Quote stage.
Select Materials.
Click Add Material or New Order.
Choose from the available vendors.
Enter materials and quantities.
Save or submit the order using the appropriate workflow.
If the vendor directory cannot be loaded, employees can still use vendors already associated with the job or enter a vendor name manually.
2. Materials — Apply Material Template
The Apply Material Template workflow was improved.
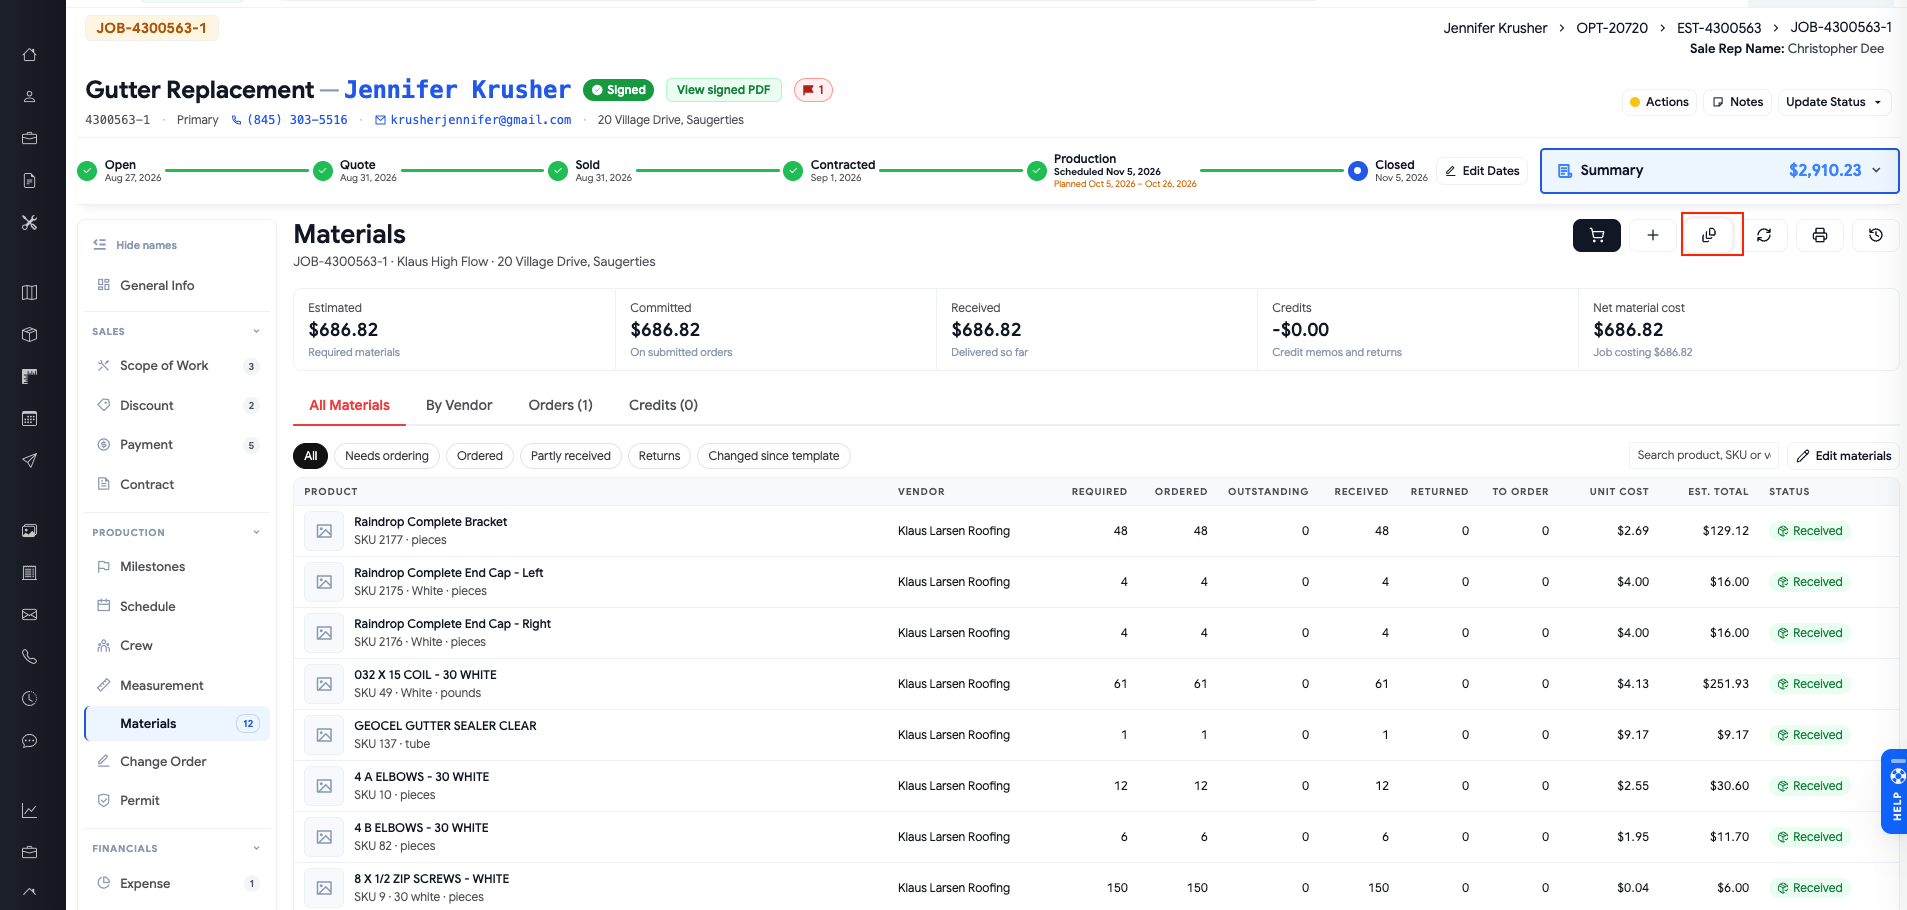
Where: Job → Materials → Apply Material Template
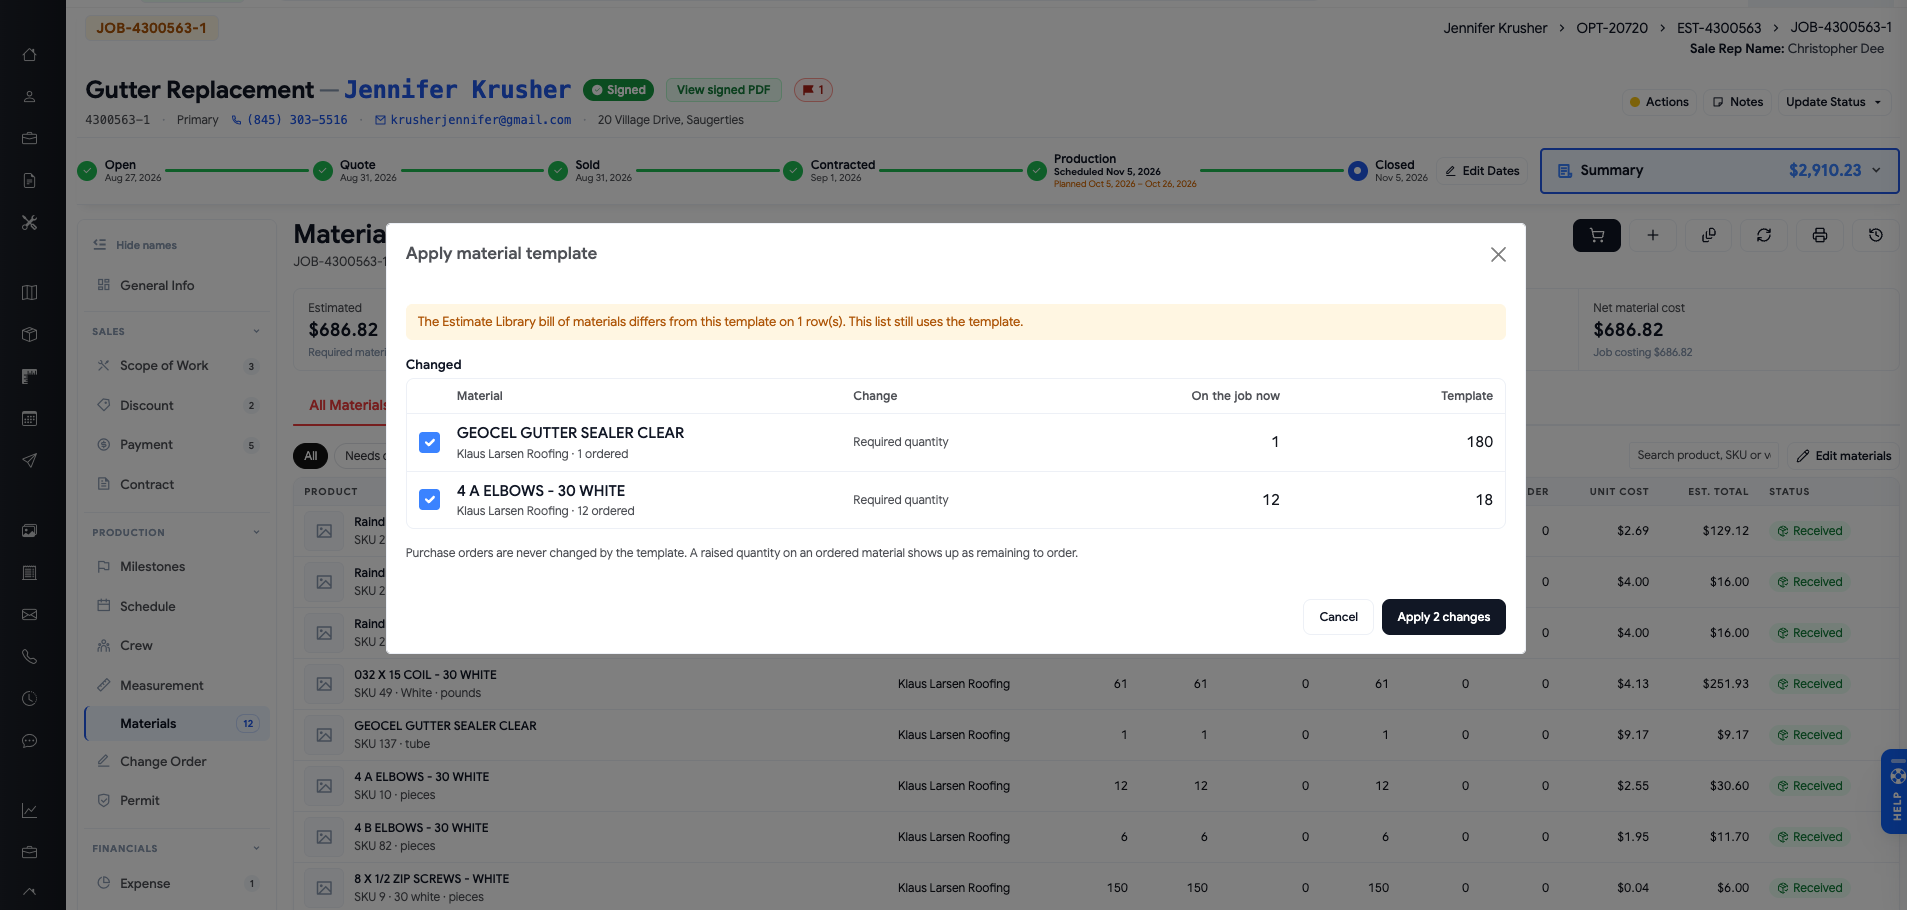
Instead of immediately replacing the material list, Klaus Connect now allows employees to review the changes before applying them.
The review can show:
Materials being added
Materials being removed
Quantity changes
Price changes
Vendor changes
Product color changes
Protecting Existing Orders
Materials already included on a purchase order are protected from changes that would conflict with that order.
Employees can also preserve quantities they previously entered manually.
For example, if a Project Manager adjusted a material quantity based on the actual job requirements, that quantity can be kept instead of being overwritten by the template.
How to Use
Open Job → Materials.
Select Apply Material Template.
Review the proposed changes.
Confirm which quantities should be updated.
Leave manually adjusted quantities unchecked when they should remain unchanged.
Apply the changes.
If the underlying template changed while the review was open, Klaus Connect skips affected lines rather than applying outdated information.
This should reduce accidental material changes and make ordering more reliable.
3. Materials — Credit Memos & Returns
The Materials workspace now provides clearer visibility into credits and returned materials.
Where: Job → Materials → Credits
A new Credits area brings together several types of purchasing credits.
These include:
QXO credit memos
ABC Supply credit memos
Warehouse returns
Other vendor credits
This gives Production and Accounting a better way to review material credits associated with a job.
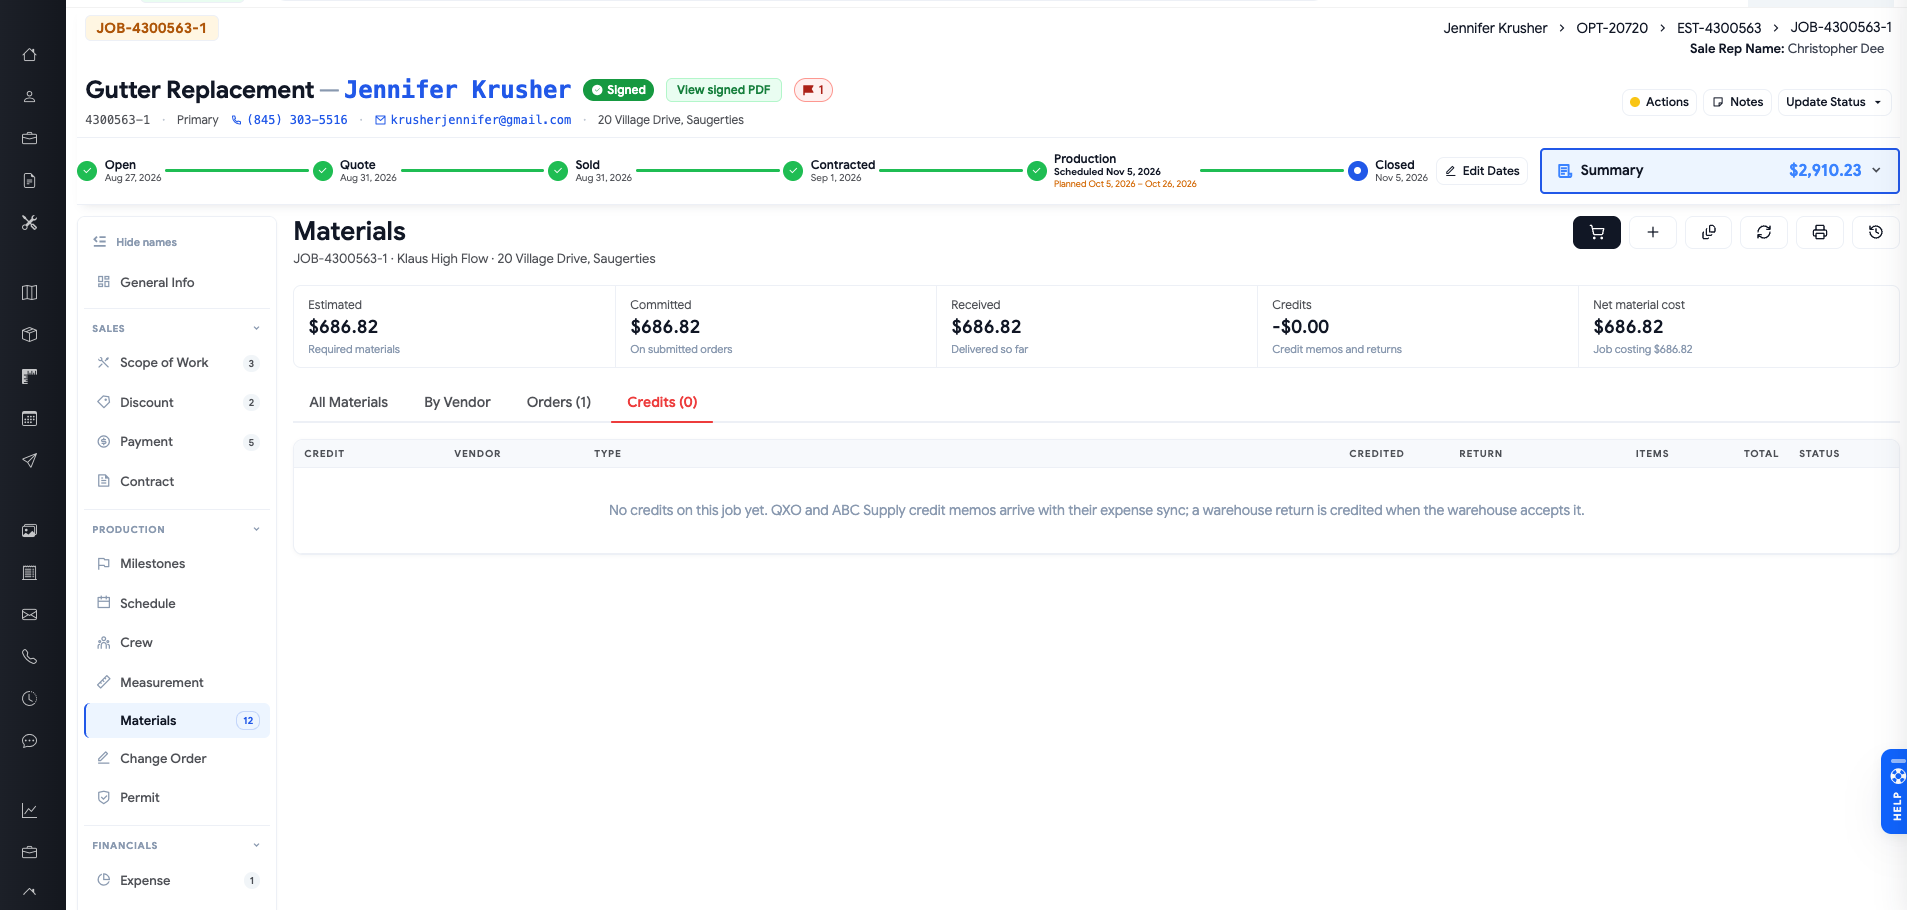
QXO & ABC Supply Credits
QXO and ABC Supply credit memos can be brought into Materials through the existing expense synchronization.
ABC Supply credits currently provide order-level information without individual product-line details.
Warehouse Returns
When Warehouse accepts a material return, the related credit can appear in the job's Materials history.
The credit is connected to the return activity rather than being treated as an ordinary vendor invoice.
Return Quantity Protection
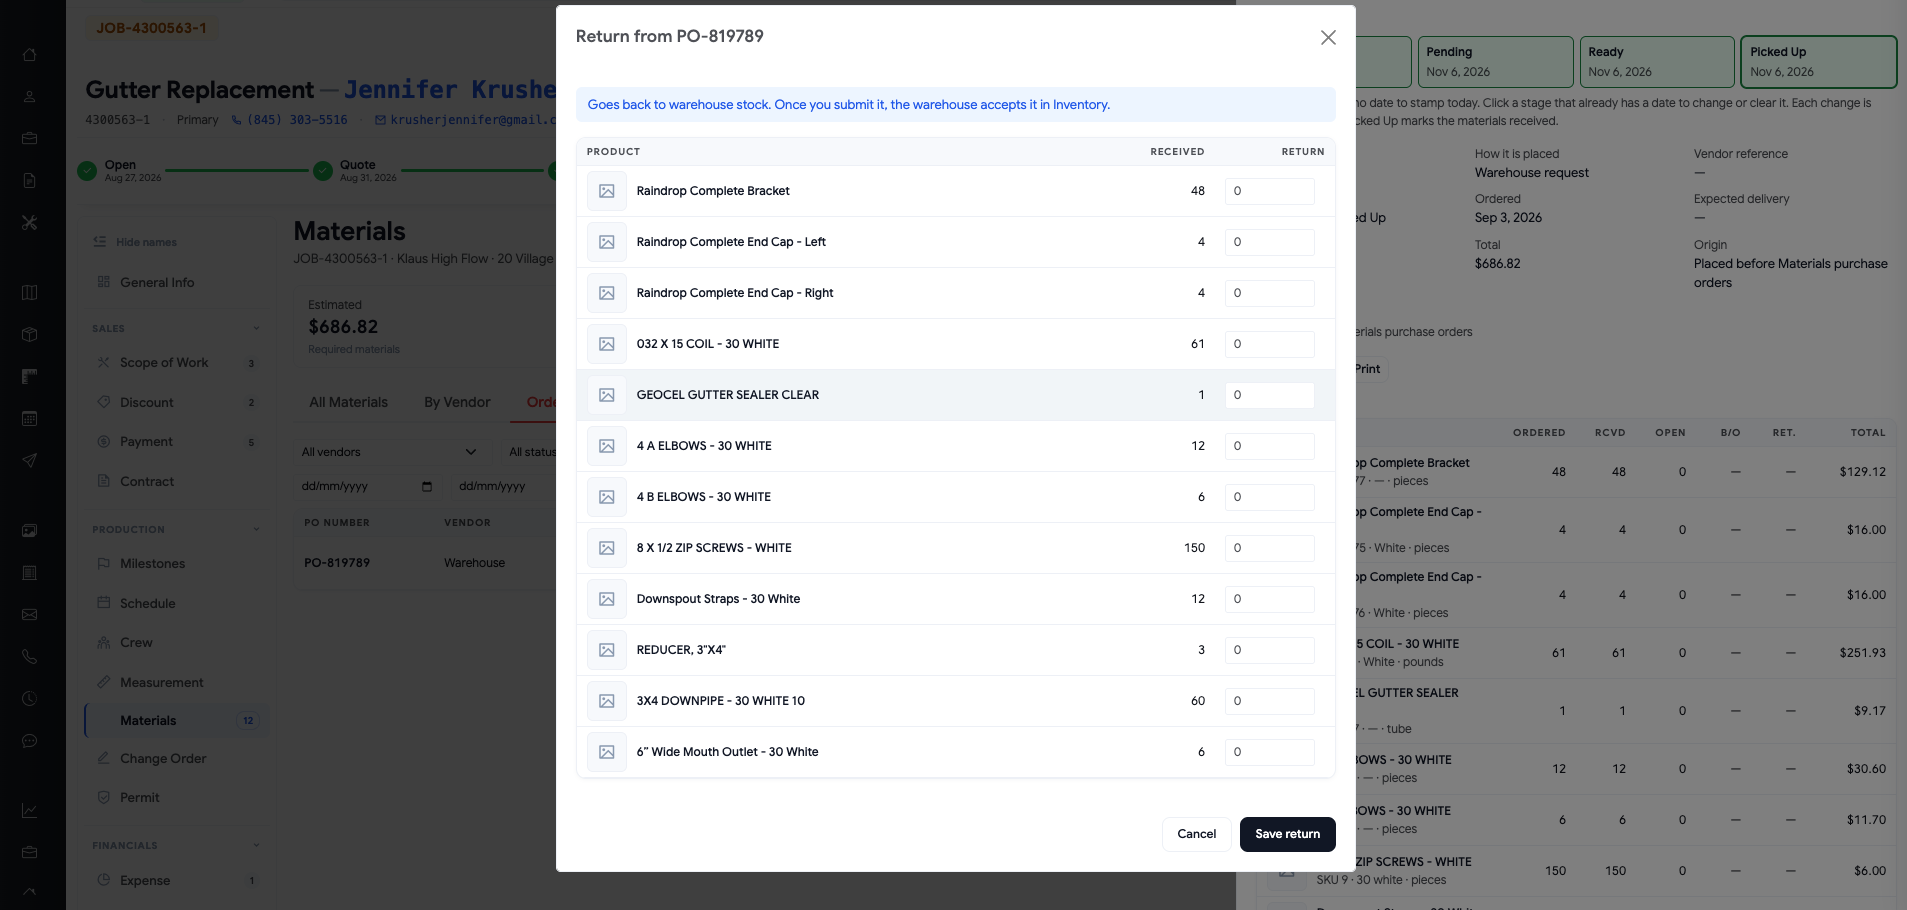
The return workflow now uses the actual purchase-order information to determine what can be returned.
For most vendors, employees can return only quantities that have been received.
QXO follows its supported order rules, allowing eligible quantities up to the ordered amount minus cancellations.
How to Use
Open Job → Materials.
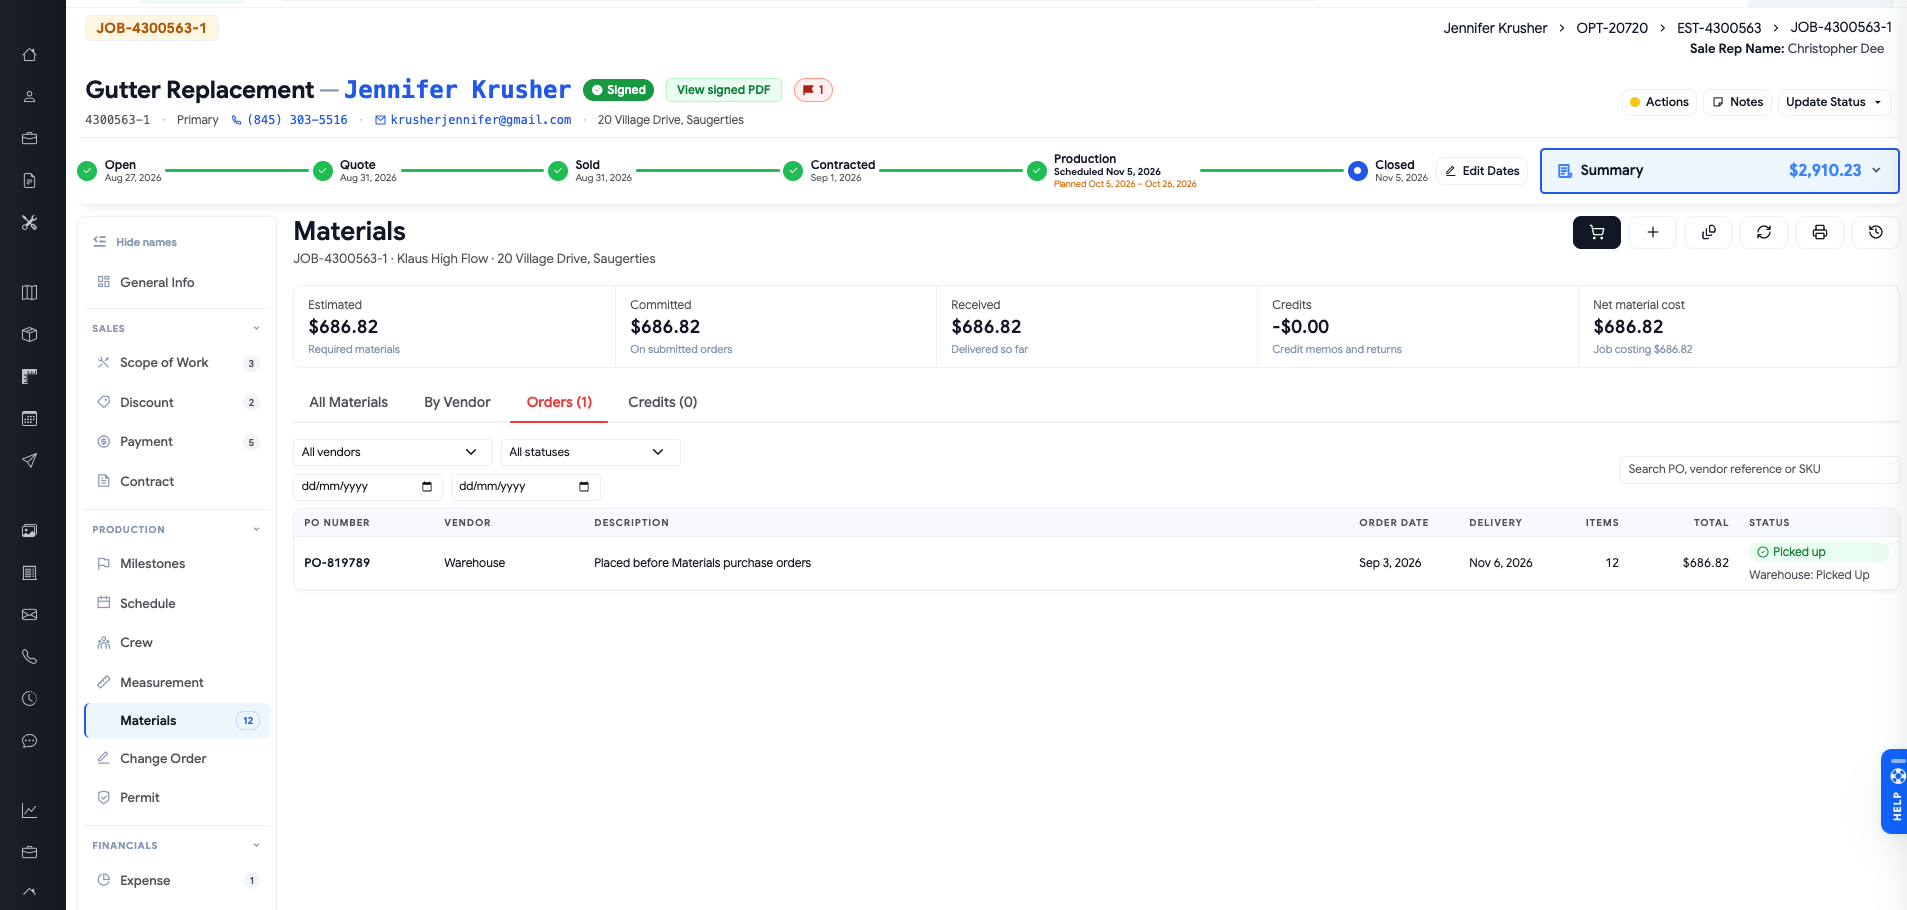
Select Orders.
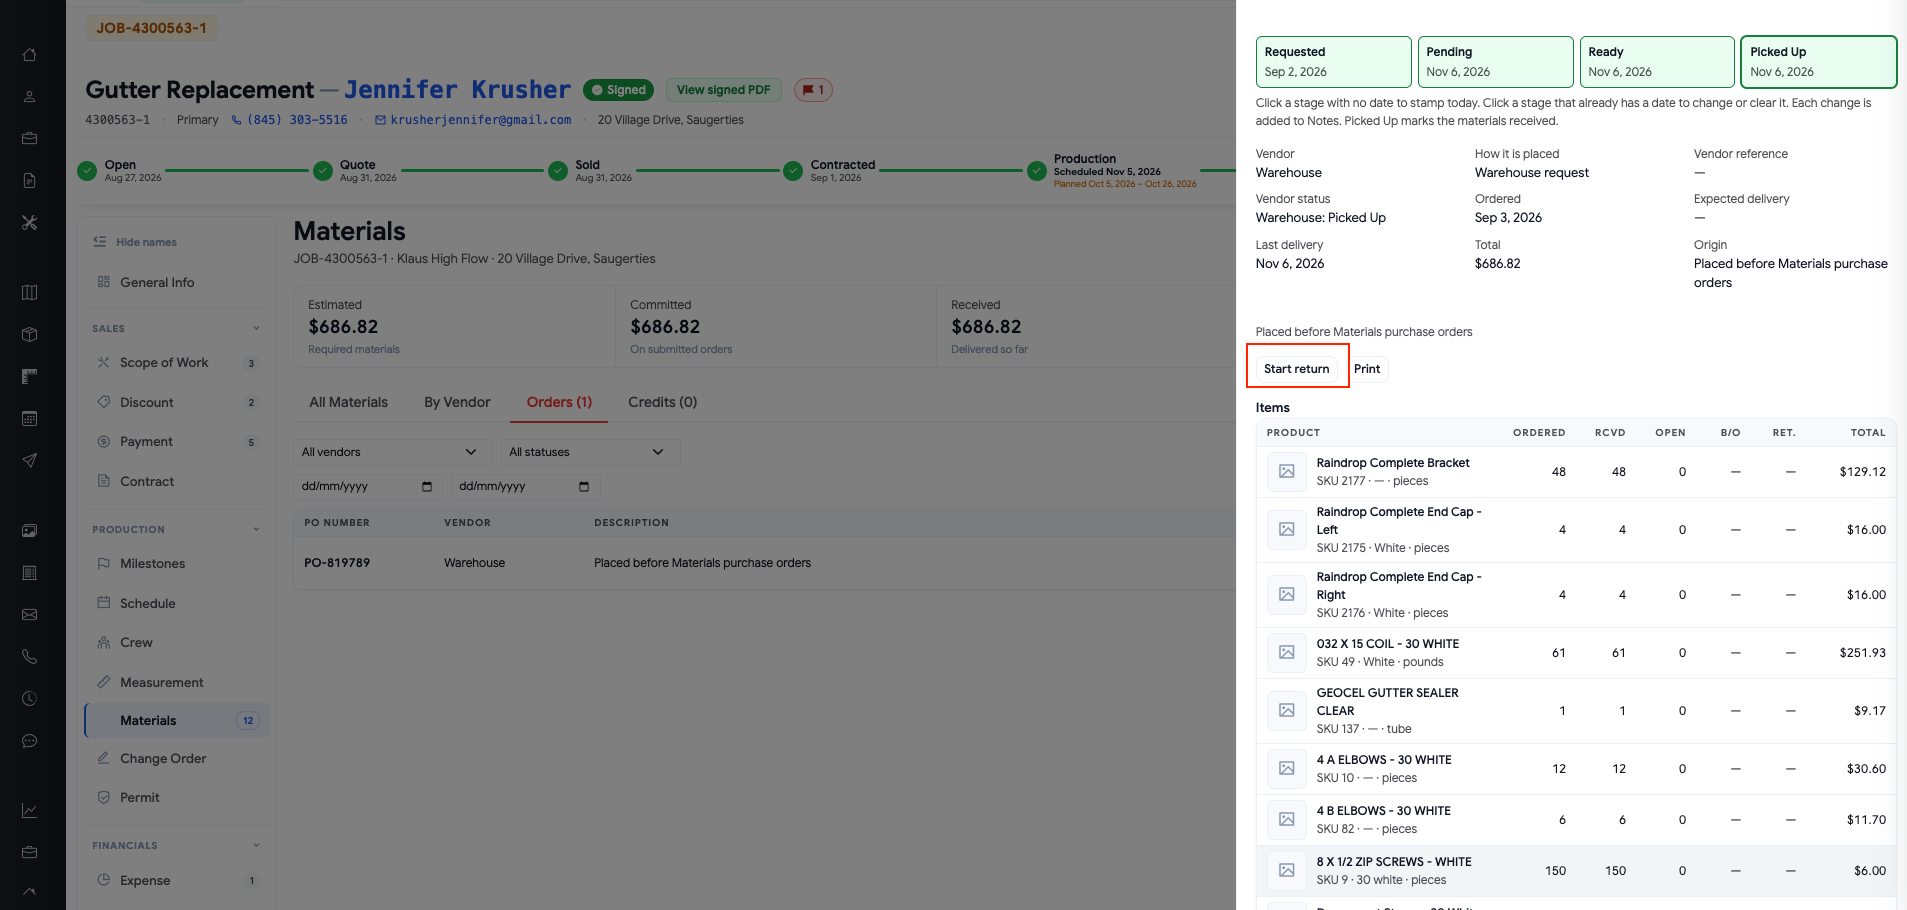
Open the purchase order containing the material.
Select the available Return action.
Review eligible quantities.
Enter the quantity being returned.
Save the return.
Submit the return through the applicable workflow.
Warehouse returns are completed through Inventory after the return is submitted and processed.
To review credits, open the Credits tab or the credit information under the vendor.
Important: A material that has not been received generally cannot be returned through non-QXO channels.
4. Materials — QXO Order Synchronization
QXO material synchronization received another improvement.
When a job's Materials workspace is opened, Klaus Connect can check for existing QXO order lines that are not yet represented in the new Materials system.
This helps bring older order information into the new purchase-order workflow.
To avoid unnecessary vendor requests, recent checks are reused for approximately three hours.
Employees can request a fresh update when needed.
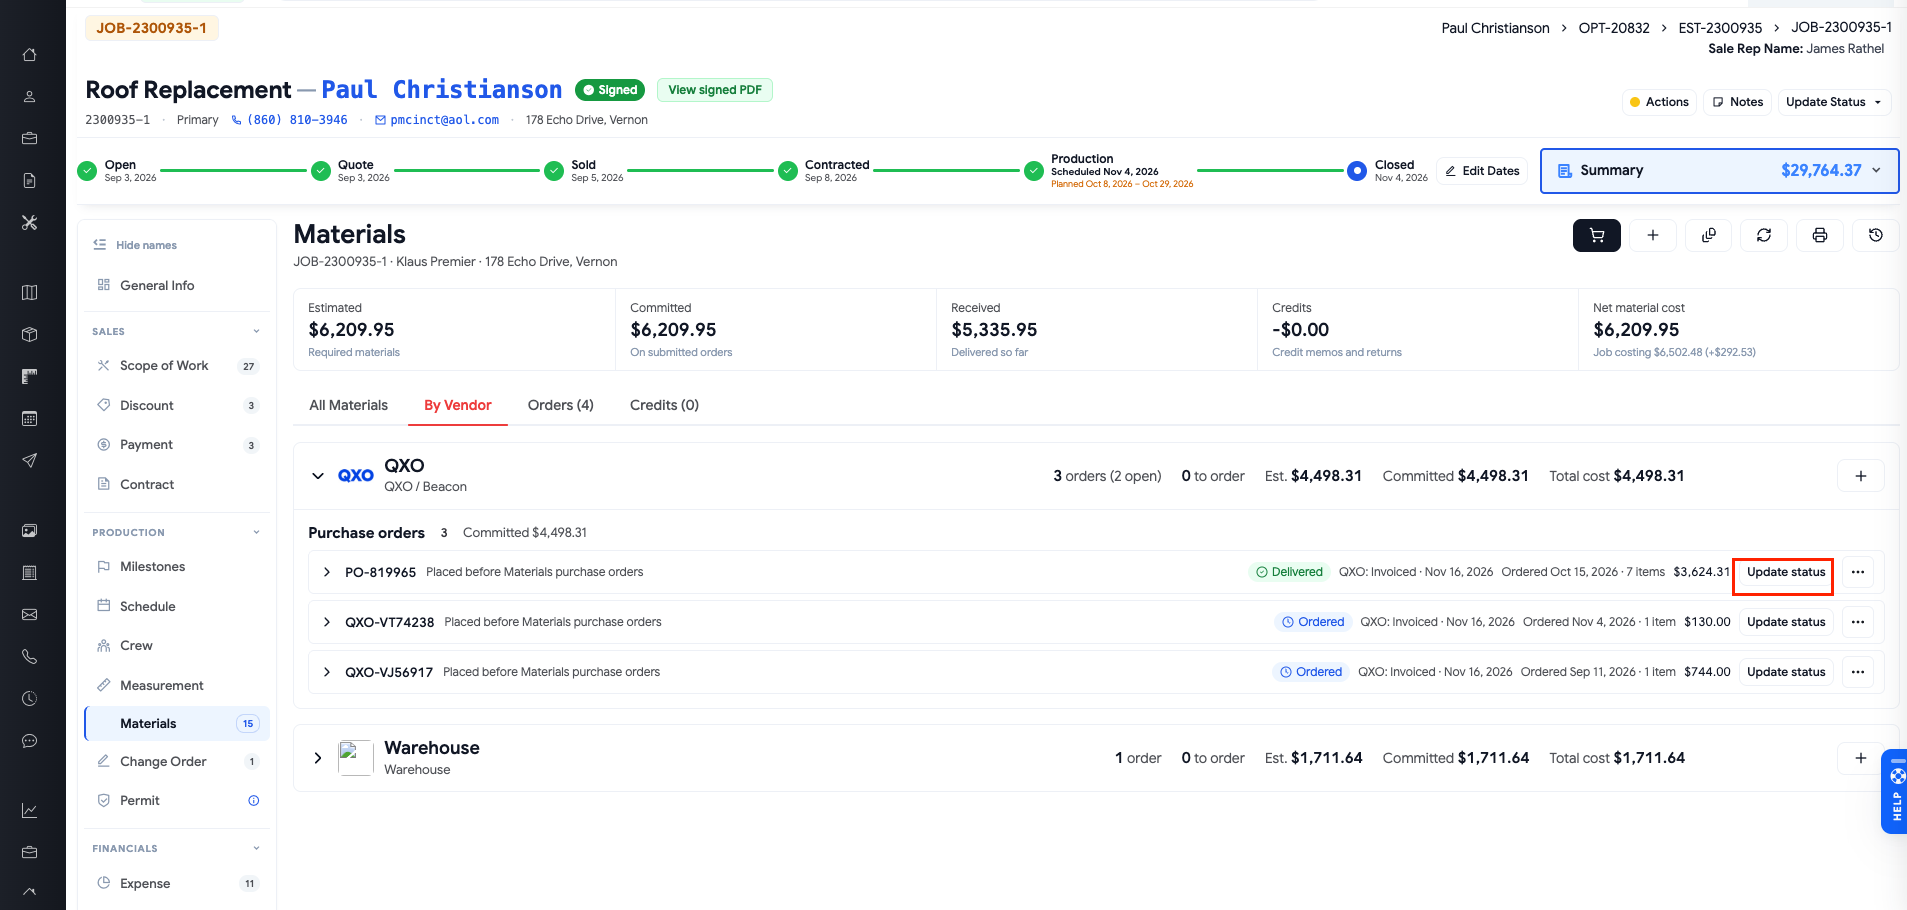
How to Use
Open Job → Materials.
Review the QXO orders and materials.
Click Update Status when current vendor information is needed.
Review quantities, status, and receiving information.
This is particularly useful for jobs with existing QXO orders created before the new Materials interface.
5. Direct Mail — Postcards & Roof-Estimate Mailers
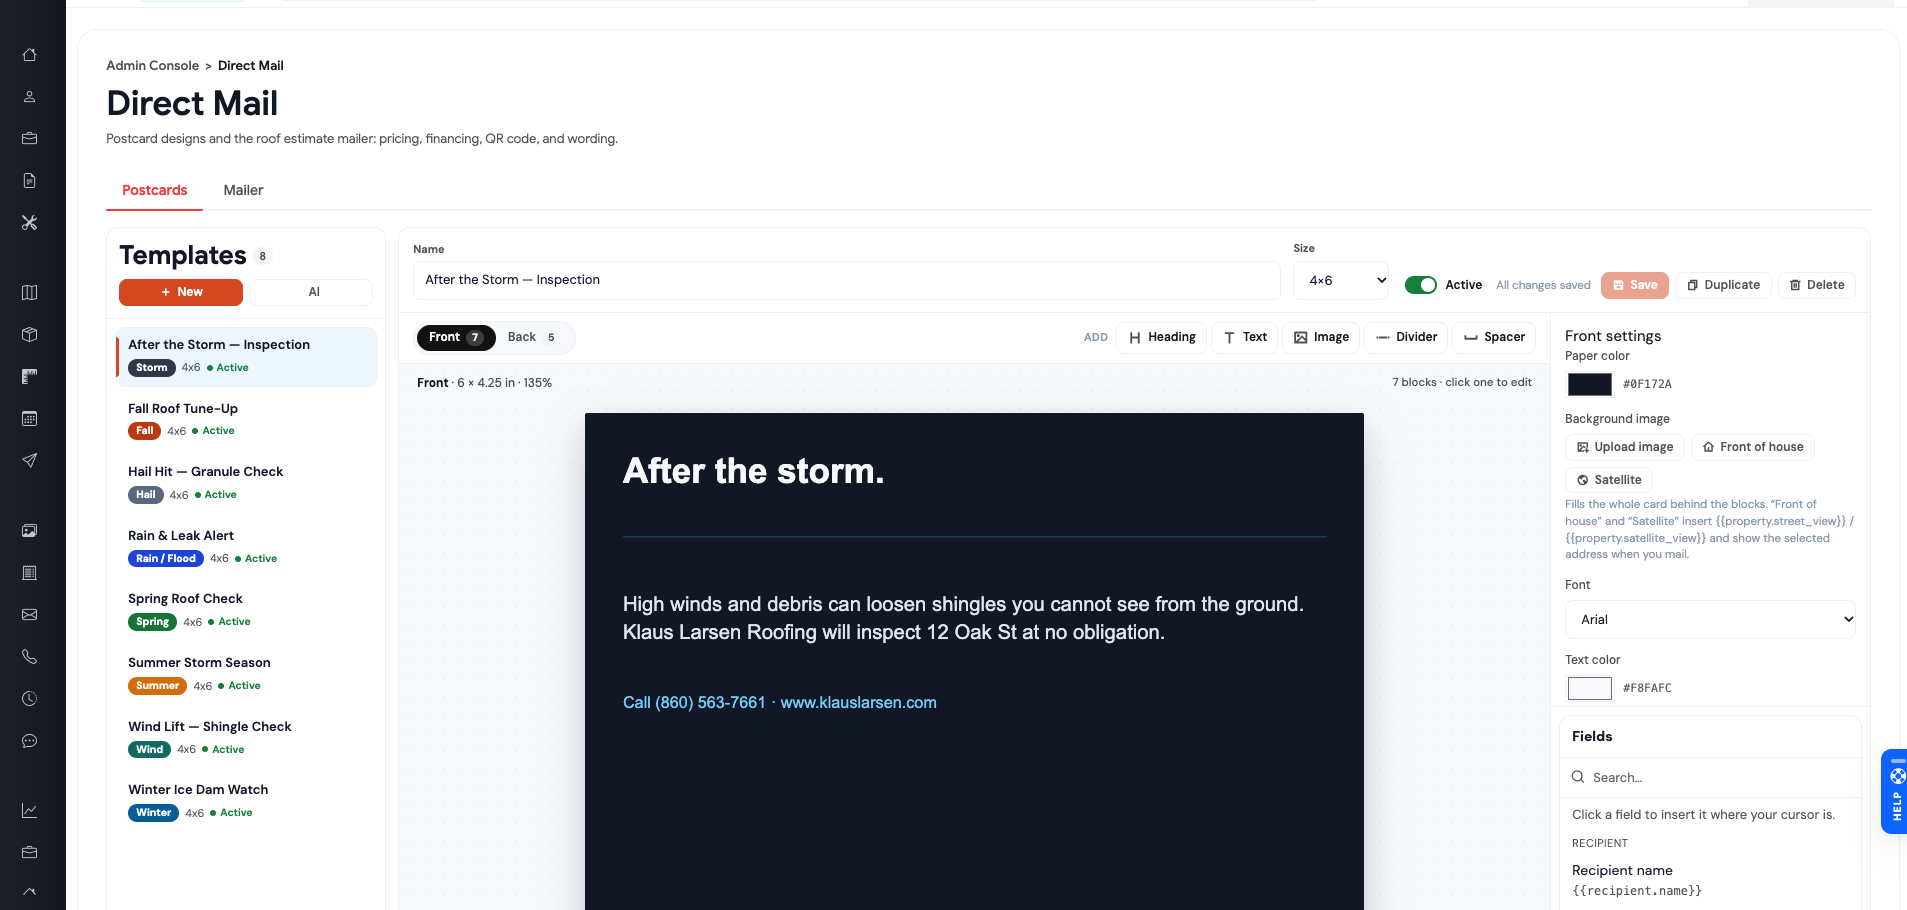
The previous Postcard Templates area has been renamed Direct Mail.
Where: Admin Console → Marketing → Direct Mail
Direct Mail now supports two types of marketing materials:
Postcards
Roof-Estimate Mailers
This expands the marketing options available through Addresses Connect.
Postcards
Postcards continue to support custom designs that can include customer, property, and storm-related information.
They can be printed or downloaded as PDFs.
Roof-Estimate Mailer
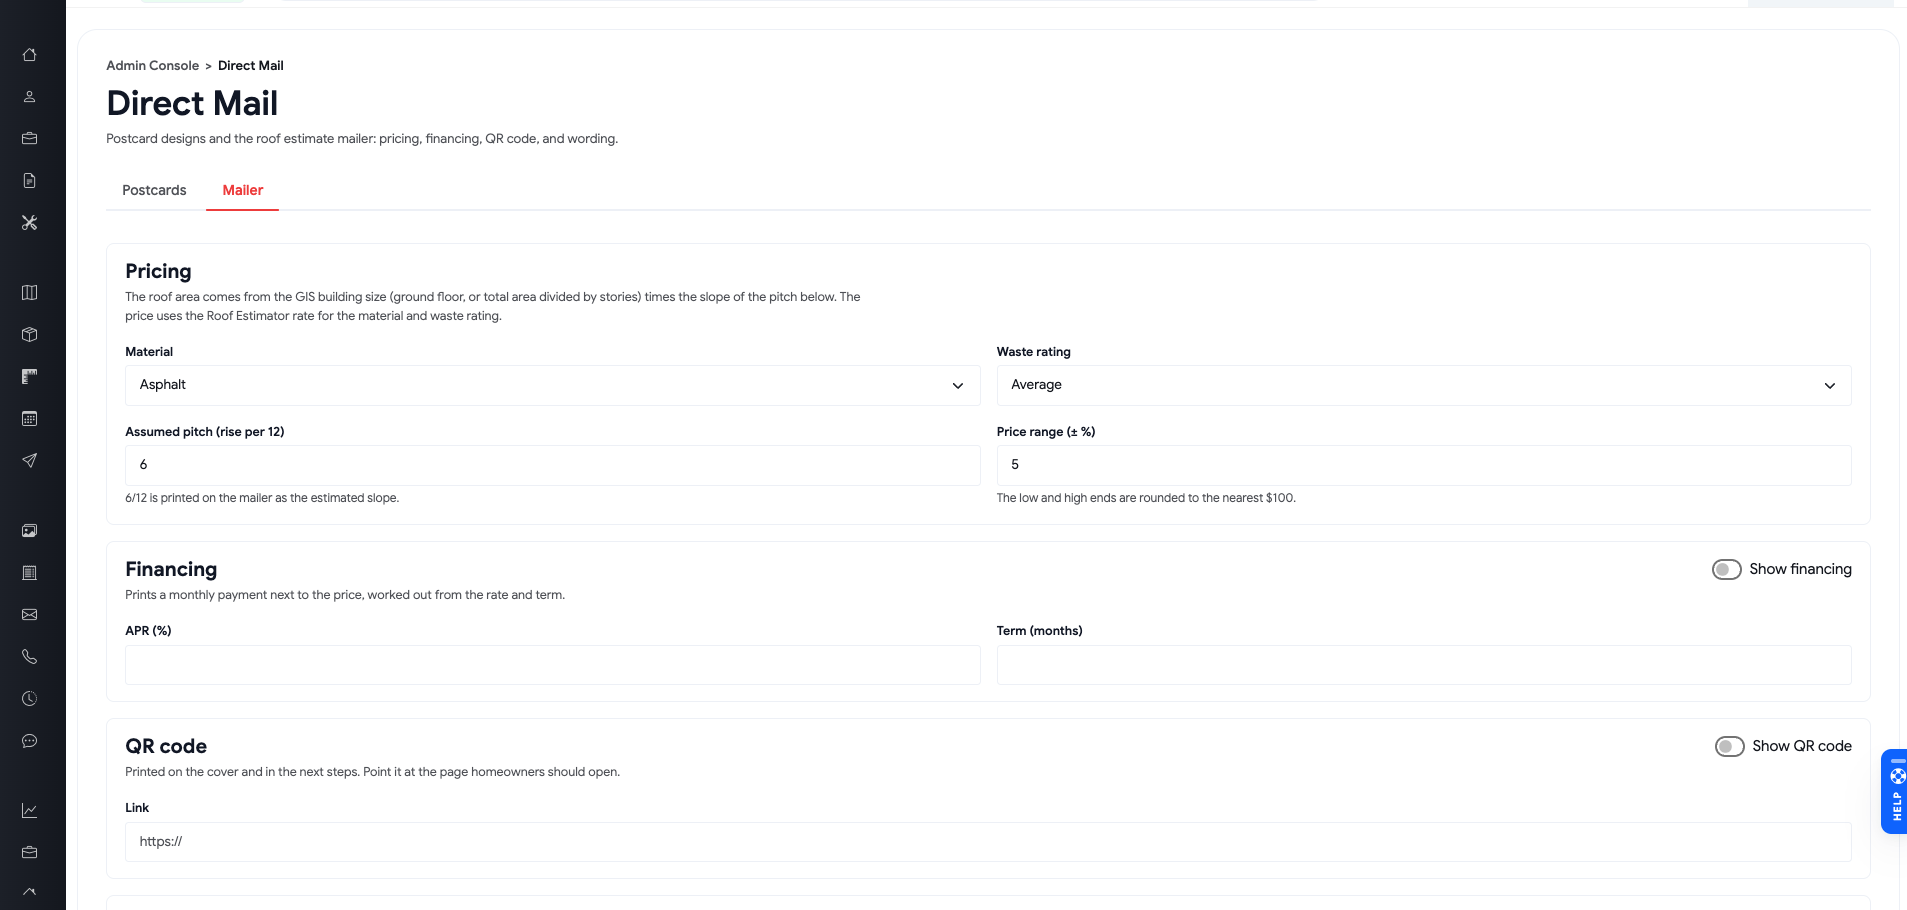
The new Mailer allows the company to prepare a property-specific roofing estimate for direct-mail marketing.
The estimate is calculated using available GIS building-size information and configured pricing.
Mailer configuration includes:
Roofing material
Waste rating
Estimated pricing
Financing information
QR code/link
Marketing wording
The goal is to provide homeowners with a more personalized marketing piece that includes an estimated roof price rather than a generic advertisement.
How to Configure
Open Admin Console → Marketing → Direct Mail.
Select Mailer.
Configure the roofing material.
Set the waste rating and pricing information.
Add financing details, QR link, and marketing wording.
Save the configuration.
How to Create a Mailer
Open Addresses → Addresses Connect.
Select the property.
Click Direct Mail.
Choose Mailer.
Review the available GIS property information.
If the GIS information is missing, perform the required lookup.
Generate the estimate mailer.
Review the calculated price and content.
Print or download the PDF.
Important: Direct Mail does not automatically send physical mail or purchase postage. Employees must print or export the material and arrange mailing separately.
The estimate also depends on available GIS measurements and properly configured Mailer pricing.
6. Backlogs — Improved Map View
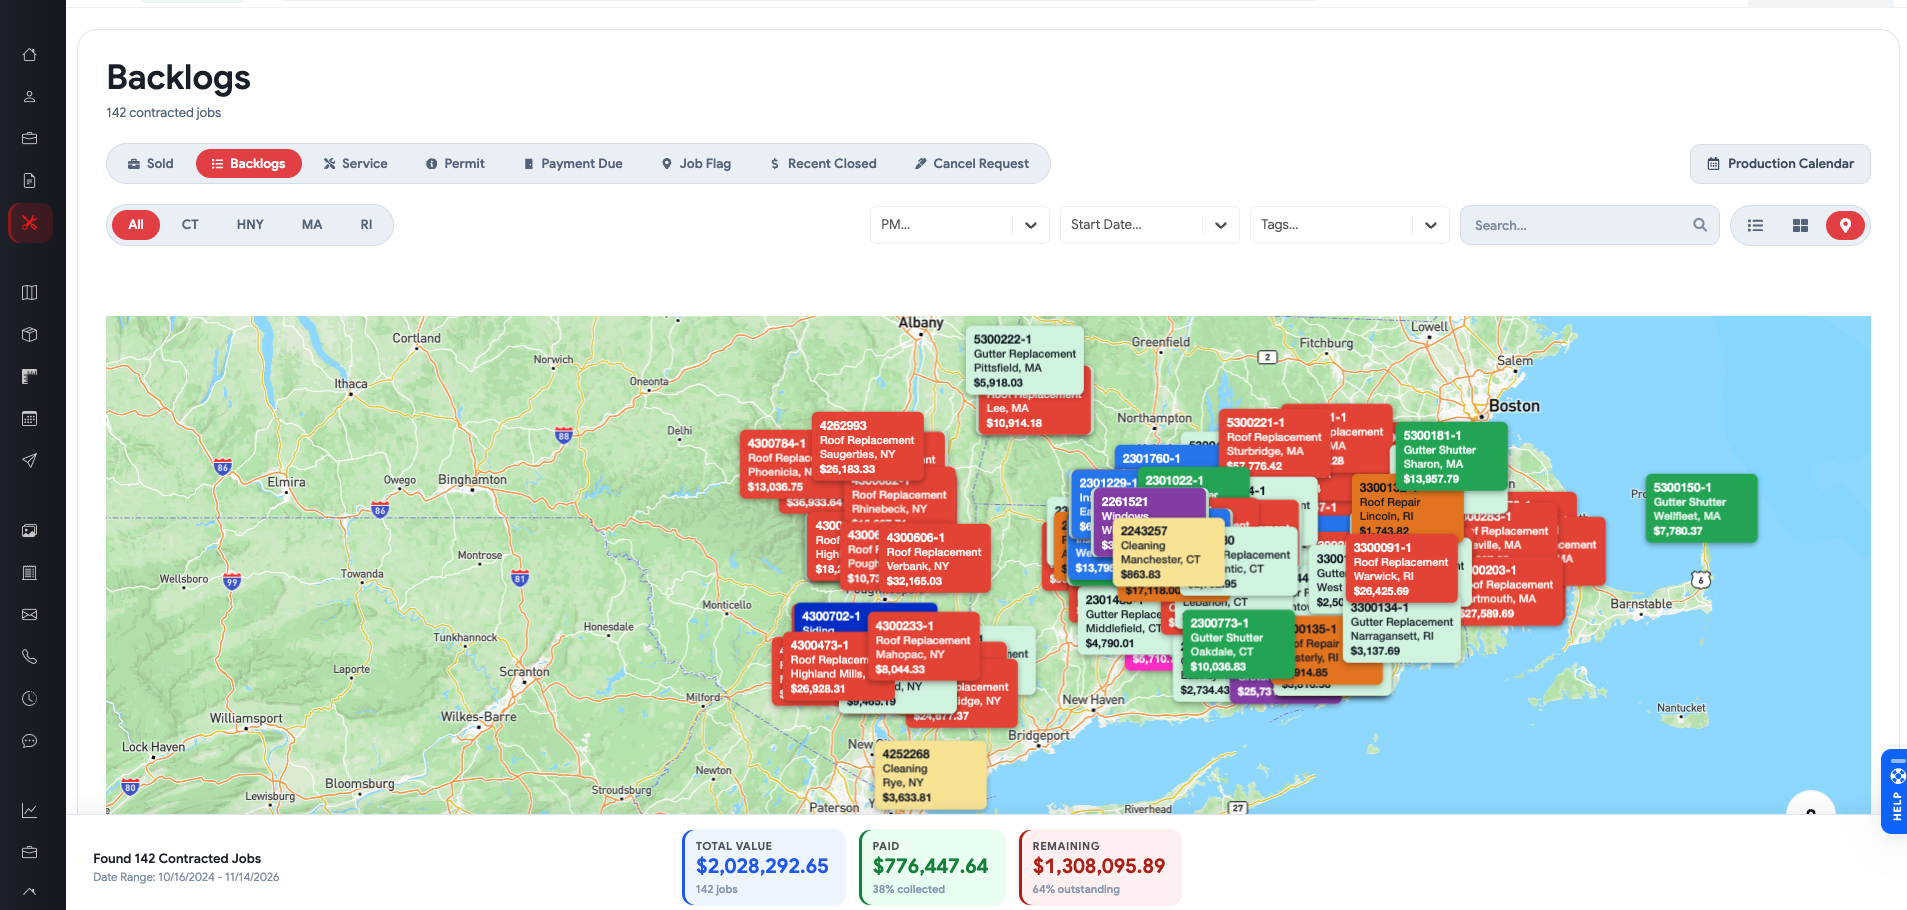
Backlog maps now use the company's service colors to identify jobs visually.
This applies to several areas, including:
Backlogs
Sold
Services
Permit
Payment Due
Job Flags
Cancel Requests
Recently Closed
Where: Backlogs → Map
Service-Based Map Colors
Each map pin uses the color configured for that job's service type under Company Services.
For example, different colors can distinguish roofing, siding, windows, and other work types.
If no service color is configured, the pin appears gray.
More Job Information
Map pins display useful job information, such as:
Job number
Install type
Town
Job value
Clicking a pin now opens the corresponding job in a new browser tab.
For Payment Due, the link opens the job's payment section.
Recently Closed — Service Filter
Recently Closed now has an additional filter:
Service
Not Service
This makes it easier to separate after-sales service work from regular completed installations.
How to Use
Open the appropriate Backlog or Production view.
Switch to Map.
Review the color-coded job locations.
Click a pin to review the job information.
Open the job in a new tab.
In Recently Closed, use Service or Not Service to narrow the results.
7. QuickBooks — Link an Existing Invoice
Klaus Connect now checks QuickBooks for an existing invoice before creating another one.
Where: Job → Payment → Manage QuickBooks Link
Previously, employees could encounter situations where an invoice already existed in QuickBooks but was not linked to the job in Klaus Connect.
The improved workflow can identify matching invoices using the job number.
Existing Invoice Found
When a matching invoice is found, Klaus Connect displays:
Invoice Already in QuickBooks
Employees can then select Link Existing Invoice rather than creating a duplicate.
If multiple matching invoices are found, the user can select the correct one.
How to Use
Open the Job.
Go to Payment.
Select Manage QuickBooks Link.
Start the invoice-creation workflow.
Review any existing invoice matches.
Select Link Existing Invoice when appropriate.
Confirm the correct invoice is associated with the job.
Important: Removing a QuickBooks invoice link from Klaus Connect does not delete the original invoice in QuickBooks.
This update should reduce duplicate invoices and simplify Accounting reconciliation.
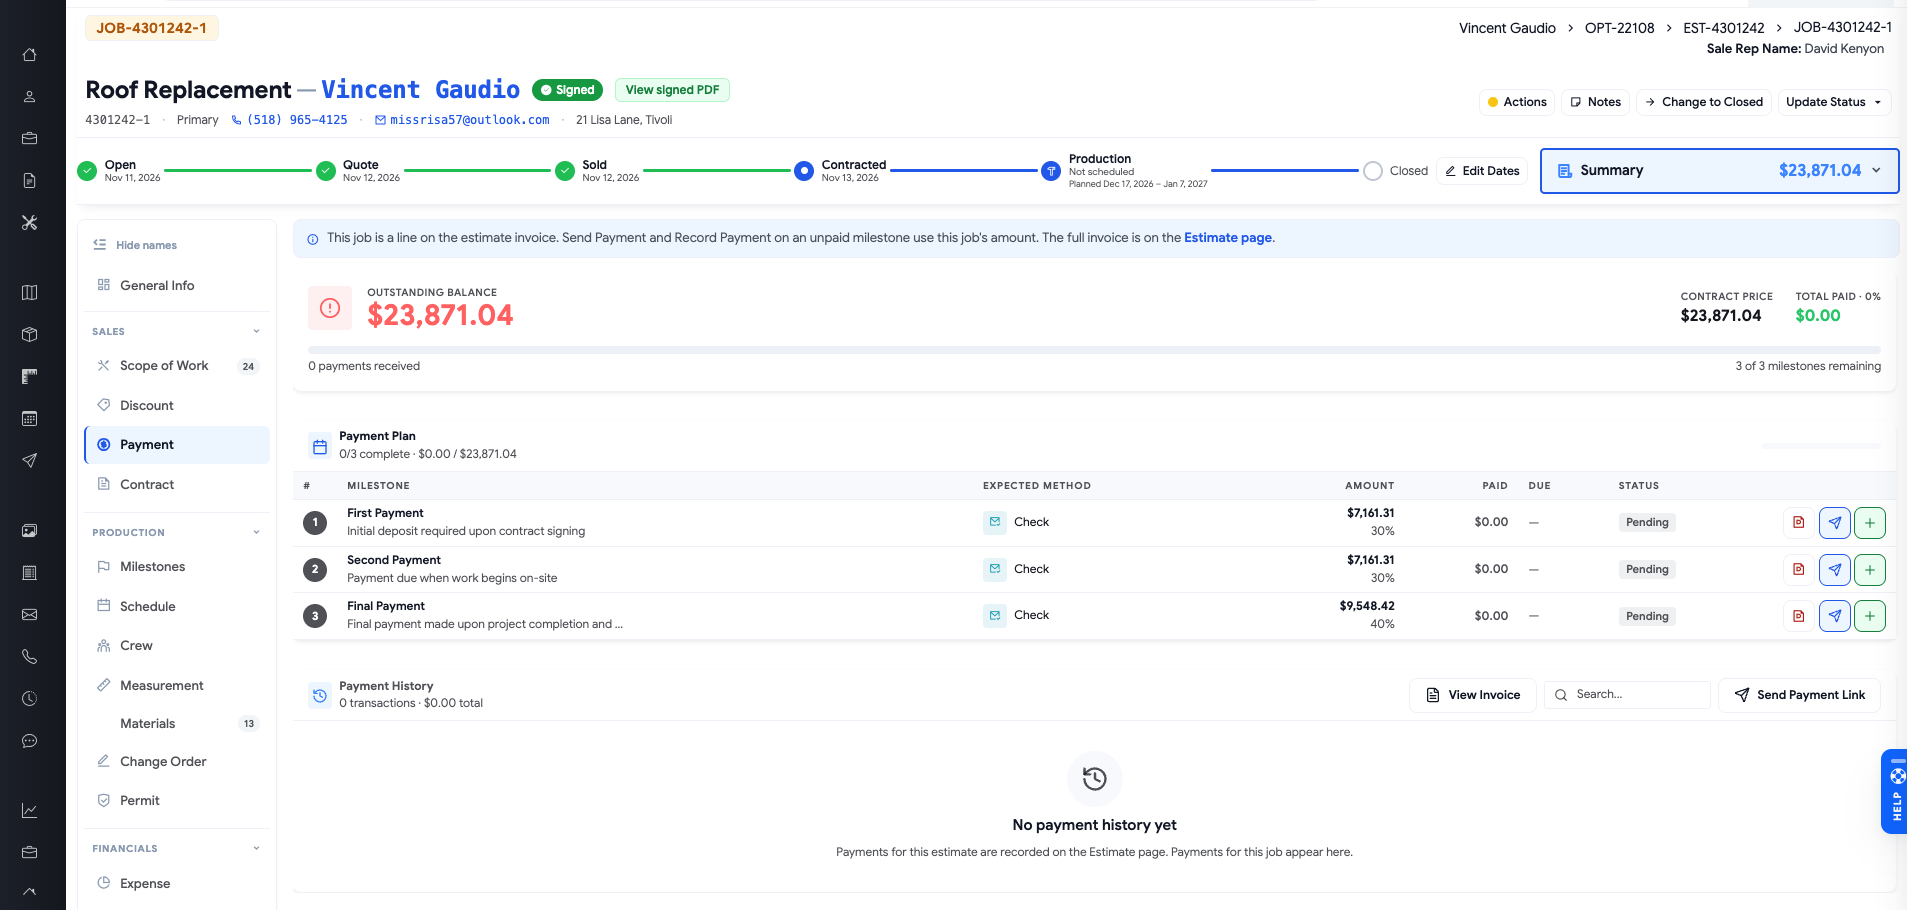
8. QuickBooks — Automatic Invoice Creation & Dates
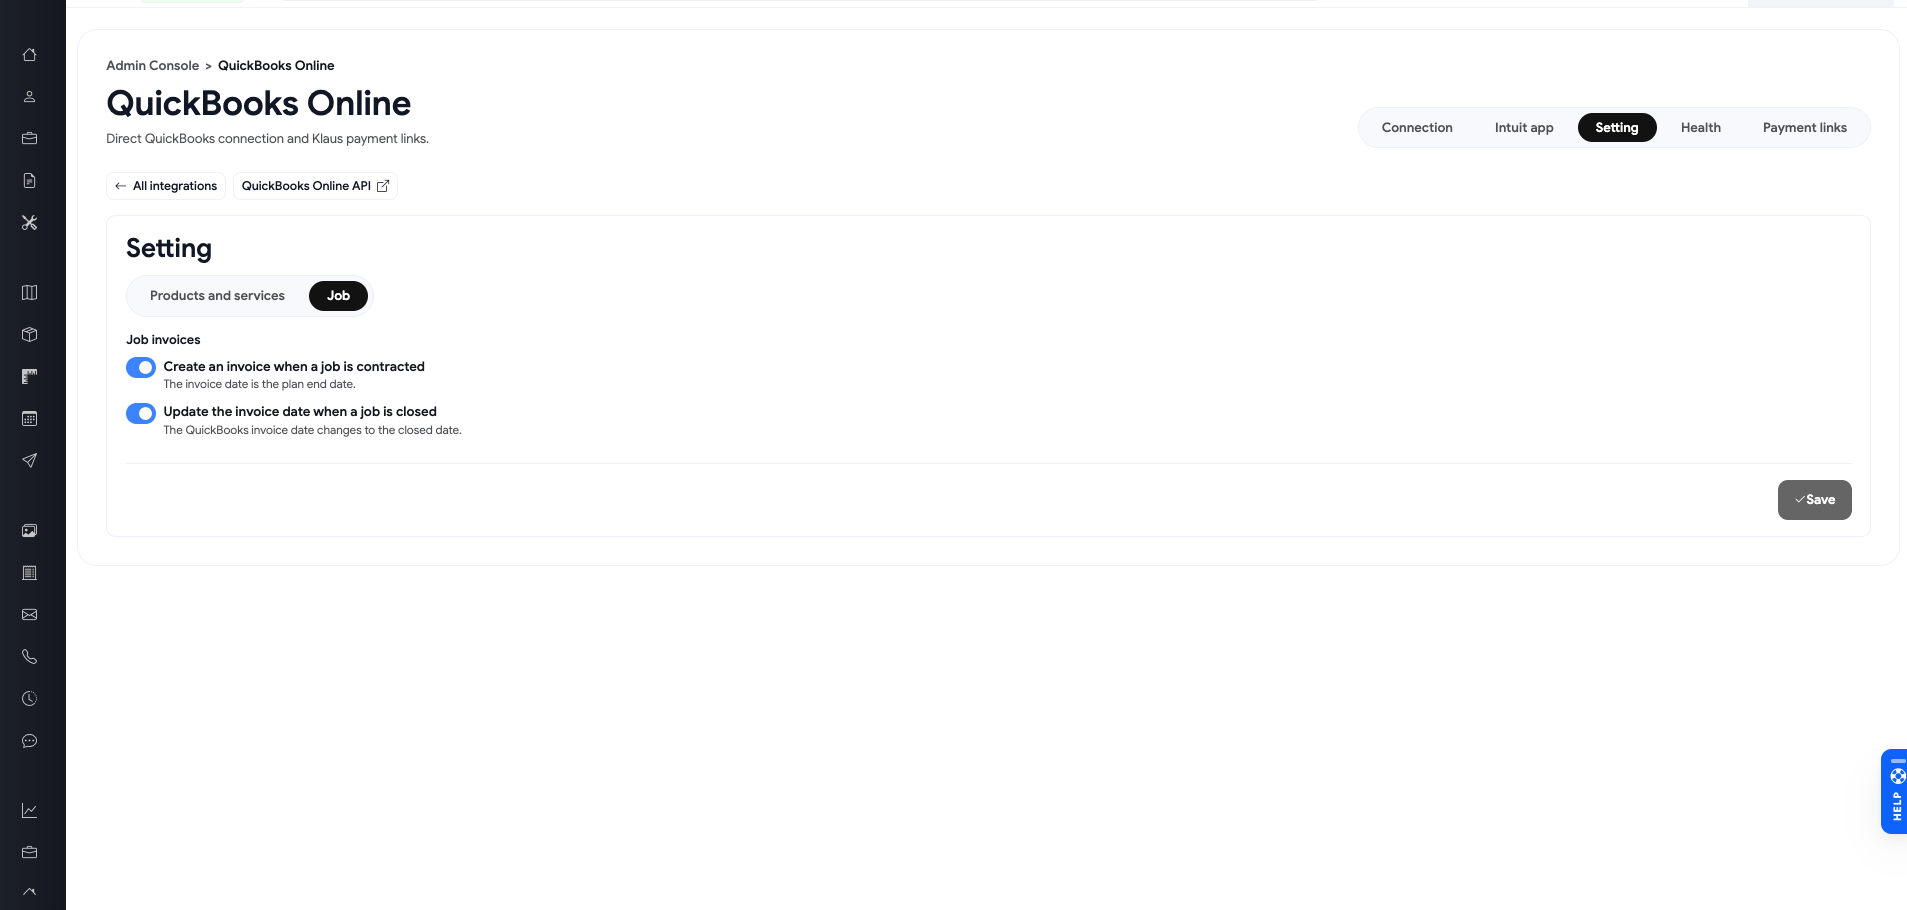
QuickBooks settings now include optional automation based on job status.
Where: Settings → QuickBooks → Job
Administrators can enable two separate options.
Create Invoice When Contracted
When enabled, Klaus Connect creates a QuickBooks invoice when the job reaches Contracted.
The invoice date is based on the job's planned end date.
If an invoice is already linked, the system does not create a second one.
Update Invoice Date When Closed
When enabled, Klaus Connect updates the linked QuickBooks invoice date to the job's Closed date.
This allows invoice dates to follow the company's selected accounting workflow.
How to Use
Open Settings → QuickBooks.
Select Job.
Enable Create an Invoice When a Job Is Contracted if desired.
Enable Update the Invoice Date When a Job Is Closed if desired.
Save.
Important: Both options are disabled by default. Accounting should review the desired invoice-date policy before enabling them.
If a QuickBooks operation fails, Klaus Connect still allows the job's status change to be saved.
9. QuickBooks — Work Type to Product Mapping
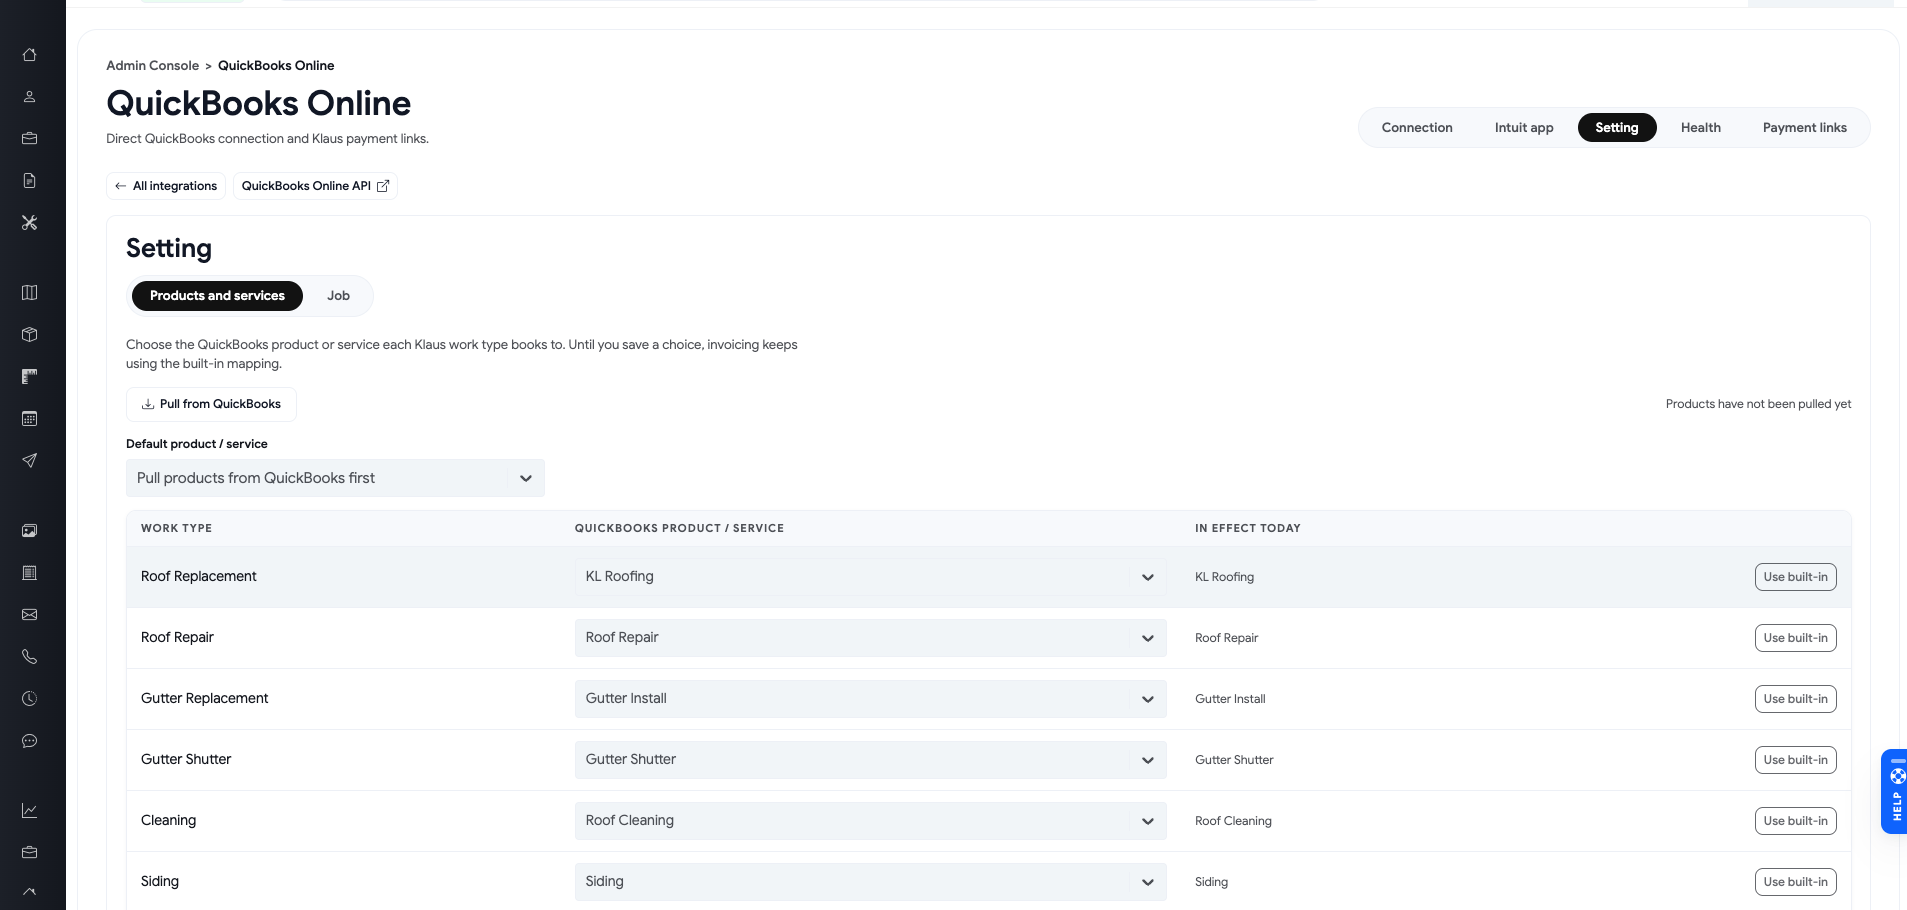
QuickBooks integration now allows administrators to choose which QuickBooks product or service corresponds to each Klaus Connect work type.
Where: Settings → QuickBooks → Products
For example, the company can define how different types of work are recorded in QuickBooks.
This gives Accounting better control over how invoice lines are classified.
How to Use
Open Settings → QuickBooks → Products.
Review the Klaus Connect work types.
Select the appropriate QuickBooks product or service for each type.
Configure a default item if needed.
Save.
Until a custom mapping is configured, Klaus Connect continues using its existing built-in mapping.
This should improve consistency between operational job classifications and QuickBooks accounting records.
10. Add Service — New After-Sales Job
Klaus Connect now includes Add Service for creating additional service work associated with an existing Opportunity.
Where: Job → Service Records → Add Service
This is useful when a customer needs follow-up work after the original project.
Examples include:
Roof Repair
Go Back
Warranty
Other configured service types
How It Works
Selecting Add Service creates a new estimate under the same Opportunity.
The service has its own estimate/job number and is identified as a service job.
This allows the additional work to be tracked separately from the original installation while remaining connected to the same customer and Opportunity.
Service Type Configuration
Under Company Services, administrators can choose which services appear in the Add Service workflow.
Go Back and Warranty are included by default.
How to Use
Open the customer's Job.
Go to Service Records.
Click Add Service.
Select the appropriate service type.
Enter the required information.
Save.
The new service appears with the other estimates associated with that Opportunity.
Important: Add Service creates a complete new estimate record, not simply a note or label on the original job.
11. Calendar — Recurring Appointment Cancellation
Calendar now provides more flexibility when cancelling a recurring appointment.
Previously, cancelling a recurring event could be confusing when the employee wanted to cancel only part of the series.
Users can now choose:
This Event
This and Following
All Events
How to Use
Open Calendar.
Select the recurring appointment.
Choose Cancel.
Select which part of the series should be cancelled.
Confirm.
The system cancels only the selected occurrences.
This should make recurring calendar management easier without requiring the entire series to be recreated.
Access depends on the employee's calendar permissions.
12. Calendar — Event Types & Colors
Calendar event types can now be managed through a dedicated settings area.
Where: Settings → Calendar → Event Types
Administrators can create and update custom event types.
Built-in event types remain protected, although their colors can be changed.
These colors are used by supported Calendar and Dispatch views.
How to Use
Open Settings → Calendar → Event Types.
Select an existing type or create a new one.
Configure its color.
Save.
This gives companies more flexibility in visually organizing calendar activities.
13. Calendar & Dispatch — Better Branch Filtering
Calendar and Dispatch filtering now uses the company's actual branch/location information more consistently.
Instead of relying on customer state or working address, location filtering uses the configured branch codes.
Where: Calendar or Dispatch
How to Use
Open Calendar or Dispatch.
Find the Location filter.
Select one or more branches.
Review the matching calendar events.
Clear the selection to return to all locations.
Dispatch includes All Locations to clear the filter.
This should make scheduling views more accurate for companies operating across multiple branches.
14. Subcontractor Documents — Signed PDF Protection
The subcontractor compensation/document workflow received an important reliability improvement.
Where: Job → Subcontractor → Documents
Klaus Connect now requires the signed document to be successfully saved before the agreement is marked Signed.
Previously, the signed status could potentially be saved even when the document upload did not complete properly.
New Protection
The updated workflow:
Applies the signature.
Uploads the signed document.
Confirms the document was saved.
Marks the record Signed.
If the document cannot be stored, the record is not marked Signed.
This helps protect the integrity of subcontractor agreements.
How to Use
Open the Job.
Go to Subcontractor → Documents.
Complete the signature process.
Confirm the document upload finishes.
Verify the record is marked Signed.
The system also protects an existing signed record from accidentally losing its signed status during later edits.
15. Job Salesperson — Better Historical Accuracy
Klaus Connect received an improvement to how Sales representatives are displayed on jobs.
Normally, the Opportunity salesperson is used.
However, there are certain cases where an existing customer schedules another appointment and the Opportunity salesperson changes.
The system now has additional checks to preserve the original salesperson on a previously sold job when the record clearly supports that assignment.
This helps reduce confusion over historical sales ownership, particularly when multiple projects are connected to one customer.
The contract's salesperson phone field also now prefers the employee's office phone, falling back to a personal phone when necessary.
16. CSR Report — Cancelled vs. Archived
The CSR Report received an important reporting change.
Where: Reports → CSR Report
Previously, cancelled and archived activity could be difficult to distinguish.
The report now provides clearer separation between:
Cancelled
Archived
Cancelled
Cancelled represents applicable cancelled appointment activity, including customer or Sales resets.
It does not treat every job cancelled during Production as a cancelled sales appointment.
Archived
Archived represents Opportunities that have been lost or archived.
The CSR Report now includes a separate Archived summary and supporting charts.
Additional CSR Metrics
The staff breakdown also includes Set-to-Cancelled percentage.
Cancellation details can show:
Cancellation reason
Cancelled By
How to Use
Open Reports → CSR Report.
Select the reporting period.
Review Cancelled for applicable appointment cancellations.
Review Archived for lost or archived opportunities.
Open the details to examine reasons and employee activity.
This should make CSR reporting more useful when evaluating actual appointment performance.
17. Reports — Correct Created By Attribution
Reporting was corrected to better identify who originally created an Opportunity.
Where: Reports → CSR or Opportunities
The system now prioritizes available activity information, such as:
Roof Ignite
AI receptionist
Staff activity history
System, when no employee can be identified
A lead source is not treated as the employee who created the Opportunity.
For example, a lead source such as Google or Referral should not receive credit as the person who entered the lead.
This correction should improve employee-level reporting and prevent inaccurate Created By totals.
Unknown appointment setters remain Unassigned rather than being incorrectly assigned to System.
18. ADL Report — Cancelled & Lost Jobs
ADL reporting received a refinement to Sold calculations.
Jobs that were sold during the selected period but are now Cancelled or Lost are excluded from the current Sold count.
The Cancelled category includes Lost activity.
This makes the reporting more consistent with the current status of those jobs.
19. Reports — Checklist Breakdown
Reports now provide more visibility into the types of checklist information completed during the sales process.
Created and Set activity can be broken down by checklist combinations such as:
Email
GIS
Both
Neither
Other combinations
Users can click a breakdown to review the corresponding Opportunities.
This can help management identify patterns in the information being collected before appointments are scheduled.
20. System Security & Stability
Several additional improvements were made behind the scenes.
Development Environment Protection
Development database copies now have stronger protections against accidentally sending real customer communications.
Scheduled outbound email, SMS, and Hatch activity are skipped when the system identifies a development database copy.
This helps prevent test environments from creating duplicate customer communications.
Database Change Protection
Additional safeguards were added to prevent unauthorized database structure changes outside the normal deployment process.
API Access Security
API tokens received additional restrictions preventing access to certain sensitive or potentially destructive operations.
These updates help protect production data and reduce operational risk.
Follow-Up Items
Materials: Continue checking that existing QXO orders and newly created purchase orders appear correctly in the Materials workspace.
Vendor credits: Verify QXO and ABC Supply credits against actual vendor records and accounting expenses.
Returns: Train Production and Warehouse employees on eligible return quantities and the required receiving/return workflow.
Material templates: Confirm existing manually adjusted quantities remain protected when applying a template.
Direct Mail: Review GIS-based roof pricing before using mailers in production marketing. Direct Mail still creates print/PDF output only.
Backlog maps: Confirm service colors and map locations are accurate across branches.
QuickBooks: Review the automatic invoice creation and invoice-date options with Accounting before enabling them.
Existing invoices: Train Accounting to link existing QuickBooks invoices instead of creating duplicates.
QuickBooks mapping: Review work-type mappings to ensure invoices use the appropriate accounting products/services.
Add Service: Confirm Go Back, Warranty, and other service types are configured correctly in Company Services.
Calendar: Verify recurring appointment cancellation and branch filtering with real scheduling workflows.
Subcontractor documents: Confirm signed documents are properly stored and remain accessible.
CSR Reporting: Review Cancelled versus Archived definitions with Management and the CSR team.
Created By: Spot-check employee attribution against known Opportunities.
ADL: Validate the treatment of Cancelled and Lost jobs.
System Stability: Continue monitoring Materials, vendor integrations, reporting accuracy, and development-environment protections.
Development note: This summary covers November 9–14, 2026. Sunday, November 15, is not included. These updates are based on the development record and have not been independently verified through live application testing.